Introduction
This tutorial, we will be making a jQuery Sliding Tab Menu for sidebar. Previously, I made a tutorial about jQuery Tabbed Interface / Tabbed Structure Menu, if you have not read it yet, check it out. I'm using it for my sidebar at the moment. The differences between both tab menus are, the sliding direction and this time, we are using a little bit different HTML structure and massive change in jQuery script.
We will be using a famous plugin called jQuery.scrollTo. jQuery scrollTo is an amazing plugin and doing sliding menu has never been so easy! Please continue reading, As usual, this tutorial is separated into 3 sections: HTML, CSS and Javascript.
1. HTML

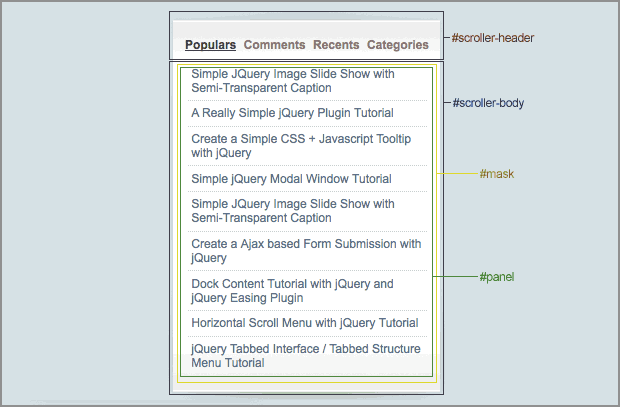
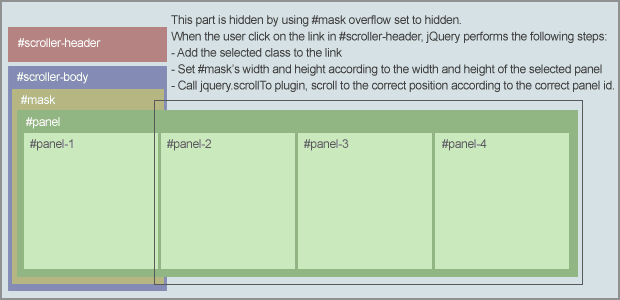
Refer to the image above, it's the DIV structure for this tutorial.
#scroller-header: Inside #scroller-header, this is where we will put the links. In the link HREF attribute, we will put in the id of the sub panels (#panel-1, #panel-2, #panel-3 and #panel-4) inside #panel. jQuery will able to scroll it to the correct position according to the ID specified in the HREF.
#scroller-body: We put a background image about 900px height and set the background position to bottom.
#mask: This DIV plays an important role to hide other panels. Adjusting the height and width of #mask will able to display the panel content. Everytime when a link is clicked, jQuery will get the height of the sub-panel and set the height of #mask accordingly.
#panel: Inside #panel, we have 4 DIVs named #panel-1, #panel-2, #panel3, #panel-4. Those are sub-panels, you can place your content inside here, and feel free to add more sub panels.
<div id="scroller-header">
	<a href="#panel-1" rel="panel" class="selected">Link 1</a>
	<a href="#panel-2" rel="panel">Link 2</a>
	<a href="#panel-3" rel="panel">Link 3</a>
	<a href="#panel-4" rel="panel">Link 4</a>
</div>
<div id="scroller-body">
	<div id="mask">
		<div id="panel">
			<div id="panel-1">
				......
			</div>
			<div id="panel-2">
				......
			</div>
			<div id="panel-3">
				......
			</div>
			<div id="panel-4">
				.......
			</div>
		</div>
	</div>
</div>
2. CSS

There are some important css:
#scoller-header, #scroller-body : We can change the background images in these ID. For the #scroller-body, the vertical alignment of the background must be bottom.
#mask : Width is the size of a sub-panel, this width must be specified because we will do some calculation based on it.
#panel div : Float set the left so that the DIV will display in a single row. If you want to scroll it horizontally, you can remove it.
body {
	padding:0;
	margin:0 20px;
	background:#d2e0e5;
	font:12px arial;
}

#scroller-header a {
	text-decoration:none;
	color:#867863;
	padding:0 2px;
}

#scroller-header a:hover {
	text-decoration:none;
	color:#4b412f
}

a.selected {
	text-decoration:underline !important;
	color:#4b412f !important;
}

#scroller-header {
	background:url(images/header.gif) no-repeat;
	width:277px;
	height:24px;
	padding:35px 0 0 15px;
	font-weight:700;
}

#scroller-body {
	background:url(images/body.gif) no-repeat bottom center;
	width:277px;
	padding-bottom:30px;

}

#mask {
	width:250px;
	overflow:hidden;
	margin:0 auto;
}

#panel {

}

#panel div {
float:left;

}


/* extra optional styling for each tab content */
#panel-1 {
}

#panel-2 {
}

#panel-3 {
}
3. Javascript
With the scrollTo plugin, we don't have to worry about the transition and scrolling effect. This is the advantage of using plugin, everything can be so easy.
Basically, jQuery performs the following steps on page load:
- Get the height of the first sub-panel and set it to #mask.
- Calculate the width of #panel by multiplying #mask width with total of sub-panel (#panel div)
- Set the width of sub-panel according to the #mask width. As a result, #mask width must be the same with sub-panels and must be specified in the CSS.
And, jQuery performs the following steps when a link is clicked:
- Get the height of the sub-panel. jQuery grabs the sub-panel id from href attribute of the anchor element.
- Remove selected class from all the links, and add the selected class to the user has just clicked.
- Do the animation on height, Animate the #mask by setting the height of the sub-panel.
- After that, run the scrollTo plugin, scroll it to the sub-panel.
- Remember to disable the link default behavior by adding 'Return false' in the end.
$(document).ready(function() {

	//Get the height of the first item
	$('#mask').css({'height':$('#panel-1').height()});

	//Calculate the total width - sum of all sub-panels width
	//Width is generated according to the width of #mask * total of sub-panels
	$('#panel').width(parseInt($('#mask').width() * $('#panel div').length));

	//Set the sub-panel width according to the #mask width (width of #mask and sub-panel must be same)
	$('#panel div').width($('#mask').width());

	//Get all the links with rel as panel
	$('a[rel=panel]').click(function () {

		//Get the height of the sub-panel
		var panelheight = $($(this).attr('href')).height();

		//Set class for the selected item
		$('a[rel=panel]').removeClass('selected');
		$(this).addClass('selected');

		//Resize the height
		$('#mask').animate({'height':panelheight},{queue:false, duration:500});

		//Scroll to the correct panel, the panel id is grabbed from the href attribute of the anchor
		$('#mask').scrollTo($(this).attr('href'), 800);

		//Discard the link default behavior
		return false;
	});

});
Conclusion
That's it. Make sure you check out the demo and download the source code to play with it. If you have created your own, feel free to drop your link in the comment section to show off! : )
Last but not least, I need your support :) If you like this article, please help me to promote it by adding this post into your bookmark. Or you can subscribe to my RSS for more jQuery tutorial posts! Thanks!

Comments will be moderated and
rel="nofollow"will be added to all links. You can wrap your coding with[code][/code]to make use of built-in syntax highlighter.I have used .php includes for the panel content... it all works great until I go from 2 to 3 on the same page :(
I have changed the style sheet names so they dont clash between tabs, but the 3rd one just doesn't want to work/display properly!
Sorry if someone else has already posted something about this.
Thanks for your help in advanced :)
1. Use position: fixed for #sliderWrap and then serve position: absolute to IE6 through an IE6-only stylesheet (using conditional comment) or with the “* html†hack. That way the top menu will always be visible to the user if he or she is using anything other than IE6.
2. If other elements on the page have position (other than static), you might need to add a z-index property to #sliderWrap
Keep up the great work with these tutorials!
I am using images in the list...
The panel only scrolls a fraction of the content of the "paner-3" instead of scrollin fool content of panel-4 when I press "header panel-4 button".
Does anyone have any idea?
http://jquery.aamirafridi.com/jst/
I'm not a coder, so far I'm more focused on design.
Any help to overcome these problems would be welcome. Thanks!
To view the site I use Google Chrome 4.1. When to view use Firefox 3.6 example 2 shows more bugs.
http://www.musicserbia.com/Alister/need-help.html
The modal pop up looks very nice.
I do have a tiny problem though with the width of the mask on IE. It's bigger than the window width and since my bg is centered it moves it when I have the pop up.
Any idea?